It’s always a bonus when you get free fruits and veggies from those who just can’t use them or will go to waste. You take the opportunity to find that special recipe and can up something incredible that you can share with them as a thank you.
I was fortunate to get Meyer Lemons from my sisters tree. She said that it’s an “every other year” good crop and I just happen to be living here now to enjoy these amazing citrus. I have made marmalades but a true straight up Meyer Lemon version is tart/sweet and an amazing spread on chicken or fish.
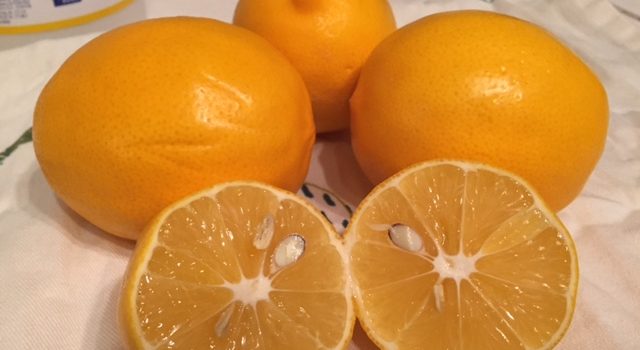
As you can see from the picture Meyer lemons are much more of an orange color than their classic lemon counterpart. They have a smooth skin and a very thin rind. Most are sweeter rather than tart and are an exception substitute in making lemon meringue pies and other lemon flavored desserts.

Meyer Lemon Marmalade
Ingredients
- 8 pc. large Meyer lemons
- 4 cups sugar
Instructions
Preparation:
- Prepare 5 half pints lids, andrings. Sterilize the jars and keep them in the hot water till its time forprocessing.
- Rinse the lemons and pat them dry. Halve the lemons and juice themremoving the seeds as you go. Reserve the juice. Using a spoon scrape out thepulp and remove any residual seeds.
- Using a sharp knife slice the peels into 1/8 inch thickstrips.
Cooking:
- In a large stainless steel or enameled Dutch combine 2 cups of water and the peels.
- Bring heat to high till youare simmering. Let simmer for 10 minutes and turn off the heat.
- Let peels sitfor 20 minutes in water. This processhelps to release the pectin and soften the peels so they are not chewy.
- Add juice and pulp and additional water to bring to 3 cups of liquid. Add 4 cups of sugar.
- Bring mixture up to a boil and continue cooking until mixture reaches 220 degrees using a candy thermometer. Once it reaches this temperature, which takes about 10 minutes, remove from heat. To test the marmalade use the Sheet or Plate test. (see bottom of this site forinstructions) If the consistency is not right put it back on the stove and boil for another minute. Retest.
Filling the jars:
- On a dishtowel placeyour hot jars and using your funnel in each jar fill leaving 1/4” headspace.
- Taking a clean papertowel wet it with warm water andwipe the rims of the jars removing any food particles that would interfere witha good seal.
- Using your magic wand extract the lids from the hot water andplace them on the now cleaned rims. Add your rings to the tops of each of thejars and turn to seal just "finger tight".
Processing:
- Make sure your rack is on the bottomof the canner and place the jars in the water bath making sure that the watercovers each of the jars by 1 to 2 inches. Add hot water to the canner if itdoesn't measure up.
- Cover the pot and turn up the heat under the canner andwait for the water to start boiling. Once the water has come to a boil startyour timer for 10 minutes.
- When complete turn off the heat and remove the coverand let the jars sit for another few minutes.
- Remove the jars and place themback on the dishtowel in a place that they will sit overnight to cool. Do nottouch or move them till the next morning.
Sealing:
- Sometime in the next hour your jarswill be making a "pinging" or "popping" noise. That is theglass cooling and the reaction of the lids being sucked into the jar for propersealing. Some recipes may take overnight to seal. Check your lids and reprocessany jars that did not seal.


Leave a Reply